 Connecting
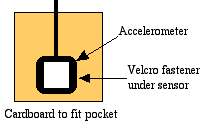
Mount the accelerometer on a small piece of cardboard with Velcro and carry it in one of the pockets of your data vest. Place the barometer in another of the pockets. Use button holes in the pocket to bring leads in to the LabQuest. Plug the leads from your accelerometer and barometer into LabQuest.
Programming
Setting Units
On the Sensor Screen, tap the space for each of the accelerometer directions and choose Change Units. Set the units to N/kg, emphasizing the force nature of the measurement. Tap the barometer space and choose the unit you wish to use, kPa or mm Hg.
Length and Sampling
Tap the Data Collection square on the right side of the Sensor Screen. Set the length of collection and the sampling rate to meet the needs of your experiment. For example, if you wish to capture an entire roller coaster ride, choose 180 seconds at 25 samples/s. You can set shorter times and faster sampling, but this is a good nominal combination.
Saving Settings
Once you have set the data collection, we recommend you save the settings so you don’t have to repeat this process on subsequent runs. Tap on File and choose Save. Give the file a name like "coaster". LabQuest will add ".qmbl" to the name, indicating that it is in LabQuest format.
Operation
- Load LabQuest into the DataVest and secure it to the rider.
Make sure the Collect button can be reached easily.
- When the ride begins, or when you get to the point on the
ride where you wish to begin collecting data, press the Collect
button. At the conclusion of the ride, if data collection has
not ended, press the Collect button again to stop collecting
data.
- We recommend you save your data at this point. Under
File, choose Save
and give the data a descriptive name like "DemonGroup5" or
"DemonJohnJane". This will help you find the data later for
more detailed study.
- Go to the Data Table Screen and under Table, choose Clear All Data. LabQuest is now ready to collect a fresh set of data using the same settings you used before. As an alternative, go to File > Open > coaster.qmbl. This opens a new copy of your original file with no data in it and you’re ready for a fresh run.
Analyzing Data
In LabQuestViewing, Examining
While it’s useful to see all of the graphs at once, it may be more instructive to examine them one at a time. Go to the Graph Screen
and choose Graph > Show Graph > Graph 1. This will display one graph. By tapping on the y-axis label, you can choose which set of data you wish to examine. By tapping on a point in the graph, the values at that point will show to the right-hand side of the graph. Thus you can determine maximum force, minimum force, etc., as well as the times for each.
Altitude: To see altitude rather than pressure, you will need to do a calculation. Go to the Data Table Screen
and choose Table > New Calculated Column… On the window that appears, name the column "Altitude" and units "m". Under Select Equation, choose AX+B. The Column for X should be Pressure. If you use mm Hg as the pressure unit, A = 11.1, B = -8436. If you use kPa as the pressure unit, A = 83.3, B = -8338. This assumes the highest pressure is 1 atm = 760 mm Hg = 101 kPa.
In Computer
Analysis can be carried out using Logger Pro and a computer. Launch Logger Pro. Connect the LabQuest to the computer using the USB-mini cable. Once Logger Pro and the LabQuest are connected, choose File > LabQuest Browser > your file. This will upload the data file including labels and units into Logger Pro. Complete your analysis there, saving your results as directed by your instructor.
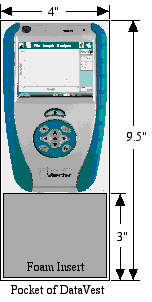
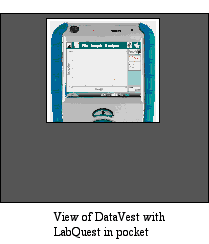
Carrying LabQuest
The pocket on your DataVest holds LabQuest easily, but it will ride too low for you to see the Collect button. One scheme is to use a piece of foam approximately 3" x 4" x 2.5" thick. Push the foam to the bottom of the pocket and the LabQuest will fit above it with the screen visible and the Collect button available to the rider. A piece of foam approximately 4" x 6.5" x 1" thick behind the LabQuest will help hold it firmly inside the pocket. See diagrams below.