Slope (cm/s)
Teacher Notes Slow, Slower, Slowest Probeware Setup
- Vernier Motion Detectors differ in the closest distance they will record. For green Motion Detectors and black Go! Motion, the closest position is 15 cm while for blue Motion Detectors the closest position is 50 cm.
- If working with LabQuest, students can tap over to the Graph Screen, then select Graph > Show Graph > Graph 1. If working with Logger Pro, students can select the velocity graph then press [delete]. Follow this by selecting Page > Auto Arrange.
- For both LabQuest and Logger Pro, teachers can set up a file and save it for their students to use during this lab. The basic instructions given speak more to using the default experiment setup than using a pre-set lab, though.
- As an alternative, the students could move a dynamics cart with their hand instead of just their hand
- Students should practice moving their hands away from the motion detector with a steady rate at the desired target speed.
- Set your software to collect data for 5 seconds at 20 samples/s, the default setup for Motion Detectors.
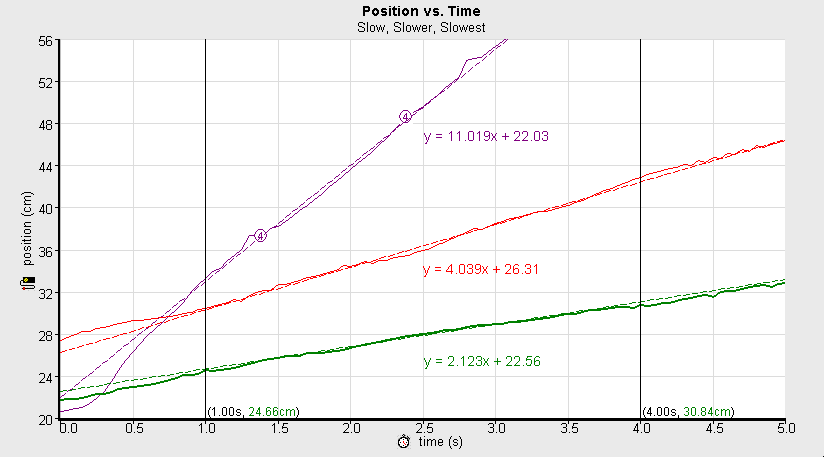
- Once students are satisfied with their data they should apply a linear fit regression line to determine the slope of their data runs. The slope is a measure of their speed.
- Finally, students should calculate the percent error using the equation:
% Error = 100 * |Measured Speed - Target Speed| / Target Speed- Students can also be encouraged to measure the slopes using the familiar equation:
m = (d2-d1) / (t2-t1)Sample Data

Slope (cm/s)
Data AnalysisThe percent error usually increases with slower target speeds. This is not the case in the sample data above. Students may have smaller errors when using target speeds of 20 cm/s, 10 cm/s, and 5 cm/s. This investigation gives students a visual and experiential comparison between the slopes of a position vs. time graph and the corresponding hand speeds.